
Merchant Console User Settings
Through the User Settings page you can control how many users are permitted to process transactions, close batches, and print reports.
Master Account
A Master (or Primary) Account has access to all aspects of the Merchant Console including the ability to unlock credit card numbers, view all types of reports, and make changes to the Console Settings. While it is possible to have more than one Master Account, we recommend that you maintain only one per merchant and create separate accounts for other users that do not include all of the privileges of the Master Account.
Users
Adding a User
Click the Add User button at the bottom of the screen. On the Add User page you will be asked to enter a username and password for the new user as well as set the user's permissions and establish a start page for the new user. Depending of what you want the new user to be able to do in the console, you can set any or all of the options on the right hand side of the screen.
You can also set the default Two Factor Authentication level for a new user. After the user is created, their Two Factor settings will be exclusively managed by them.
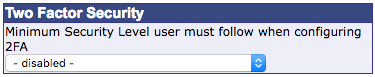
These security levels are:
- disabled
- Low: Allow Registering Computer
- Medium: Allow Registering Computer and IP
- High: Require two factor on every login
For further information, follow the link in the Two Factor Authentication section below.
We recommend that users be allowed only the permissions that they need, for example, you can set the new user's account so that he or she can perform only sale functions, or you can allow them to also make voids and close batches.
Please Note: All users must change their password once every 90 days. If you do not give a user permission to change their password, they will still be able to change their password if it has expired. To avoid this, make sure to change their password at least once every 90 days.
Editing a User
You can always edit a user account by clicking on the Edit button to the right of their username. You will be able to change any of the user's permissions and their start page as well as limiting the number of IP addresses from which they can log in.
Please Note: You cannot change a user's password from this screen. To change a user's password you must use the Change Password link. (see below)
Reset User Password
A user with a Master Account can send a Password Reset link to a user at any time. The user is emailed a Password Reset link to change and set their new password.
Please Note: Sending a password reset link will temporary lock the user's password until the user sets a new password, using the Password Reset link sent to their email. The link is valid for 24 hours.
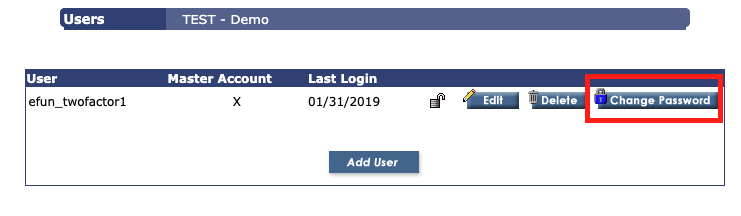
To access the Reset Password page, click on Change Password to the right of the user on the User Manager page.
The Reset Password pop up window, as shown in the image below, will appear.
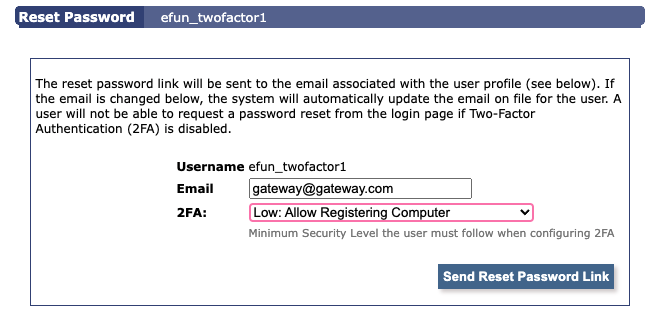
Email: The email associated with the user profile will be the only recipient of the Password Reset link once the Send Reset Password Link button is clicked. The User's email can be modified before sending the Password Reset link by clicking in the email field and entering a new valid email. If the email is modified, the user profile will automatically default to the new email.
2FA: Two-Factor Authentication is enabled and the Minimum Security Level is set to Low by default. By disabling 2FA, you are disabling the user's ability to request password reset via the "Send New Password" link found on the login page. For more information on Two Factor, please see the link in the Two Factor Authentication section.
Click  when you are ready to send the Reset Password Link. You will then be taken back to the User Manager page.
Due to Visa/MasterCard regulations, all account passwords must conform to the following guidelines:
- Must be at least 8 characters long.
- Must include at least one letter and one number.
- Cannot be the same as any of the previous 4 passwords used.
- Must be changed at least once every 90 days.
Deleting a User
You can delete a user at any time by clocking on the Delete button to the right of their username. A dialog screen will ask you to confirm this decision. Once you have deleted the user, all of their login information including password, permissions and history will be gone forever.
Please note that deleting a Master Account without first assigning a new Master Account may cause problems in the system. Please make sure that you have a new Master Account set up before deleting your existing Master Account.
User Security Features
Restricting IP Access
When adding a new user or when editing an existing user account, you can select specific IP addresses from which the user can access the system and conduct transactions.
In the box below the username and start page menu, enter the IP addresses from which the user will be permitted to access the system. To allow a user to access the system from any IP address, leave the space empty. Your current IP address will appear below the text to the left of the box.
User Permissions
To determine which functions a user can perform, set the user permissions on the right hand side of the Edit User screen.
If the user has a master account, simply check the Master box at the top. This will allow the user to perform all functions associated with your account, including issuing credits and voids, settling batches and viewing transaction details.
Alternatively you can restrict the types of functions a user can perform by selecting on certain boxes within the user permissions settings. For example, to allow a user to process sales, voids and auth-only transactions, but not settle batches, or issue refunds, simply check the boxes beside the permissions you want that user to have.
Two Factor Authentication
You can also set up two factor authentication for your user. For more information about how to set up two factor authentication, click here.