
Itemized Order
The Itemized Order page allows you to process transactions that include line item products, gift cards, products within categories, and include customer details.
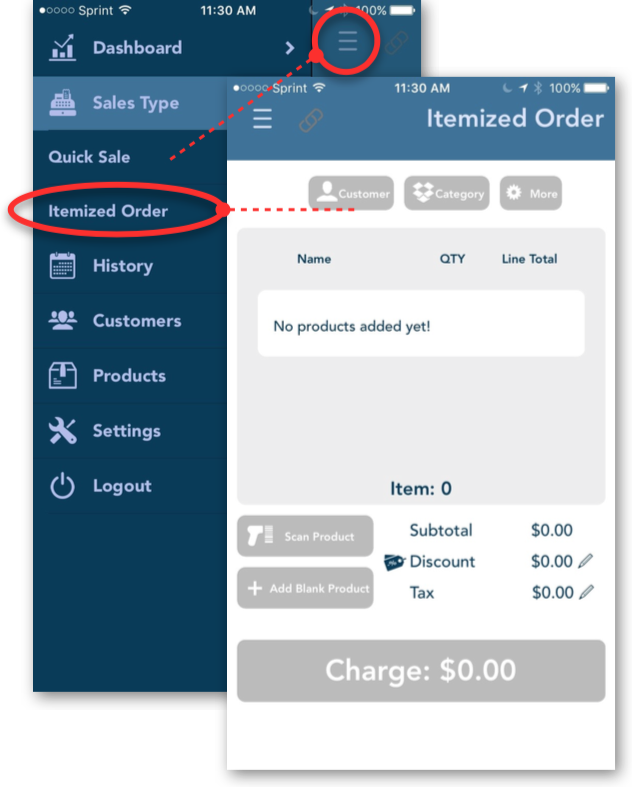
To start processing an itemized order, tap on the menu bar icon to expand the side menu bar. Tap ‘Sales Type’ then tap on ‘Itemized Order’ from the drop down menu. Refer to images shown below.
Step 1: Add Products
There are three methods to add products into your Itemized Order:
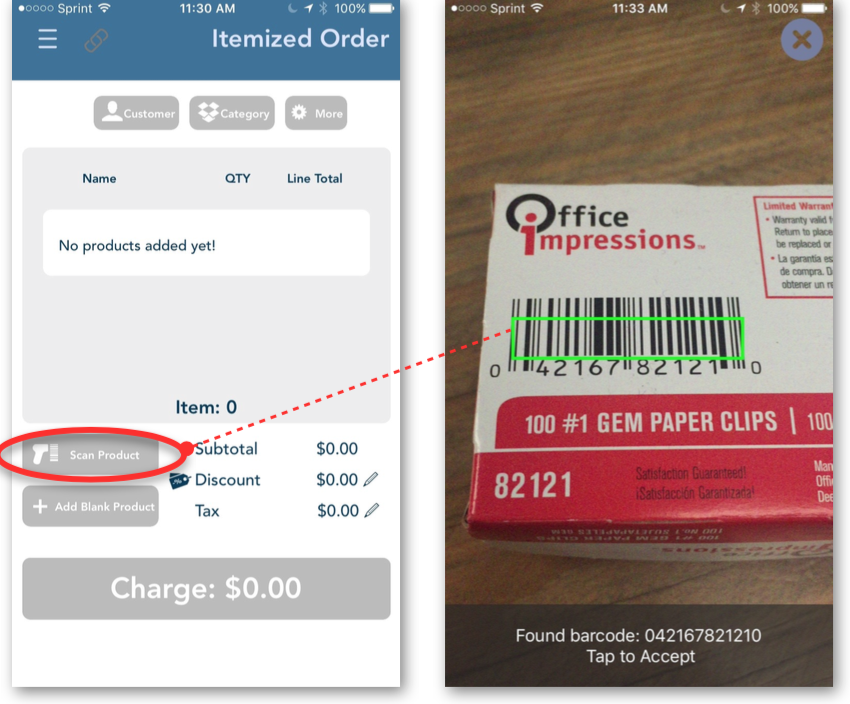
Scan A Product
To add a product by scanning the product’s Universal Product Code or UPC, tap on "Scan Product".
The USAePay lets you scan products with your camera.
Scan the product’s UPC code, the camera will indicate if the barcode was found on your screen.
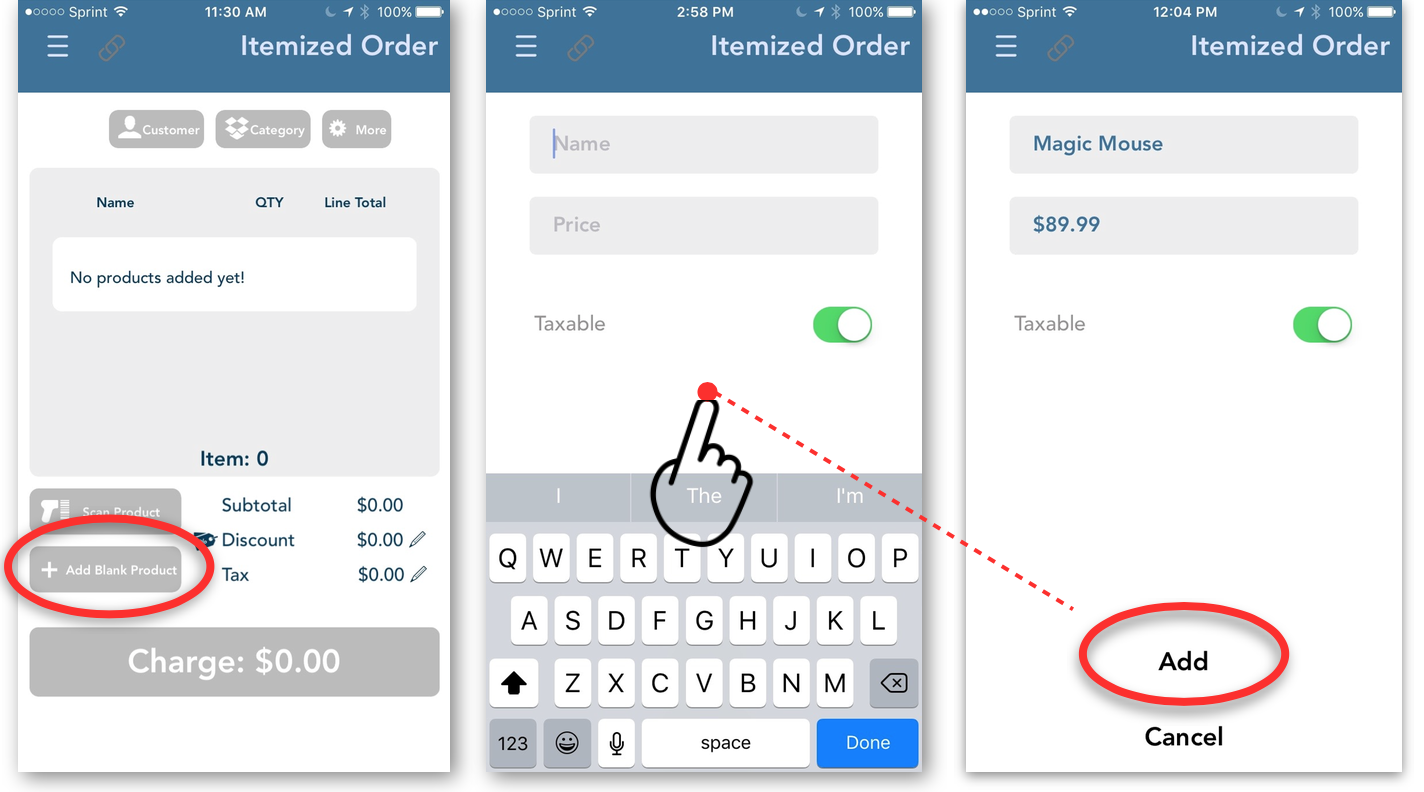
Add Blank Product
To add a blank product to your itemized order, tap on "add blank product"
Note: Blank Products act as one-time product sales. These products will not be recorded in your Product Database.
Add From Product Category
To add products from your product Categories, tap on the "Category" tab.
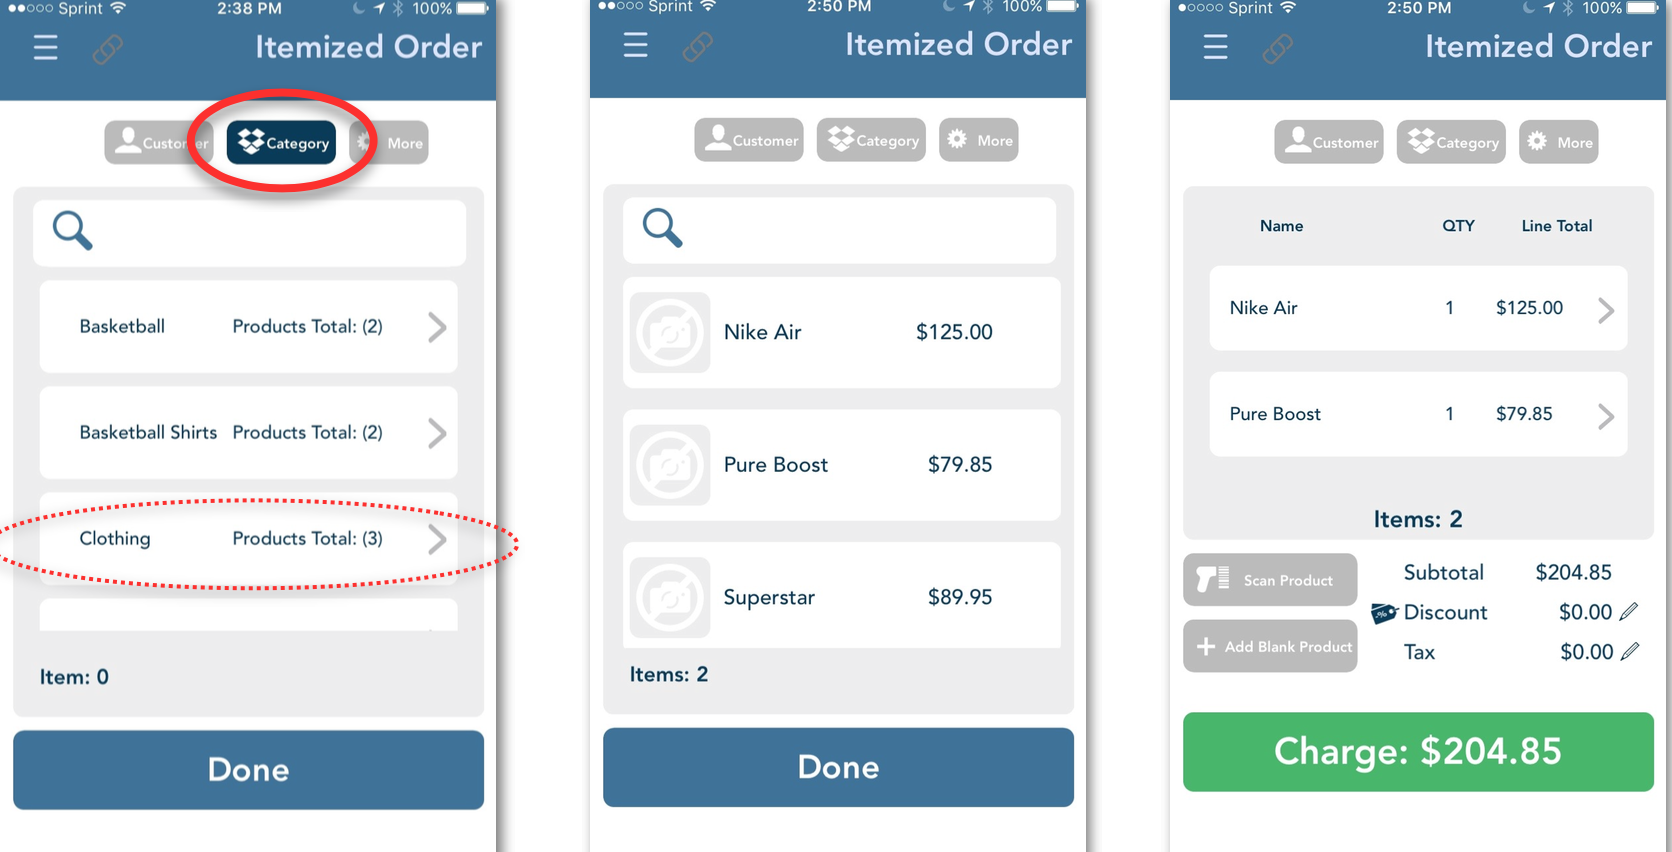
Tap on the product category for the item you want to include in the itemized order.
All the products within that category will be listed. You may view them in list or photo form by tapping the options above the Charge button. Tap on the item you want to include in the order.
You may add products in different product categories from your Merchant Console or from the ‘Products’ section of the app (See page 50 for further instructions).
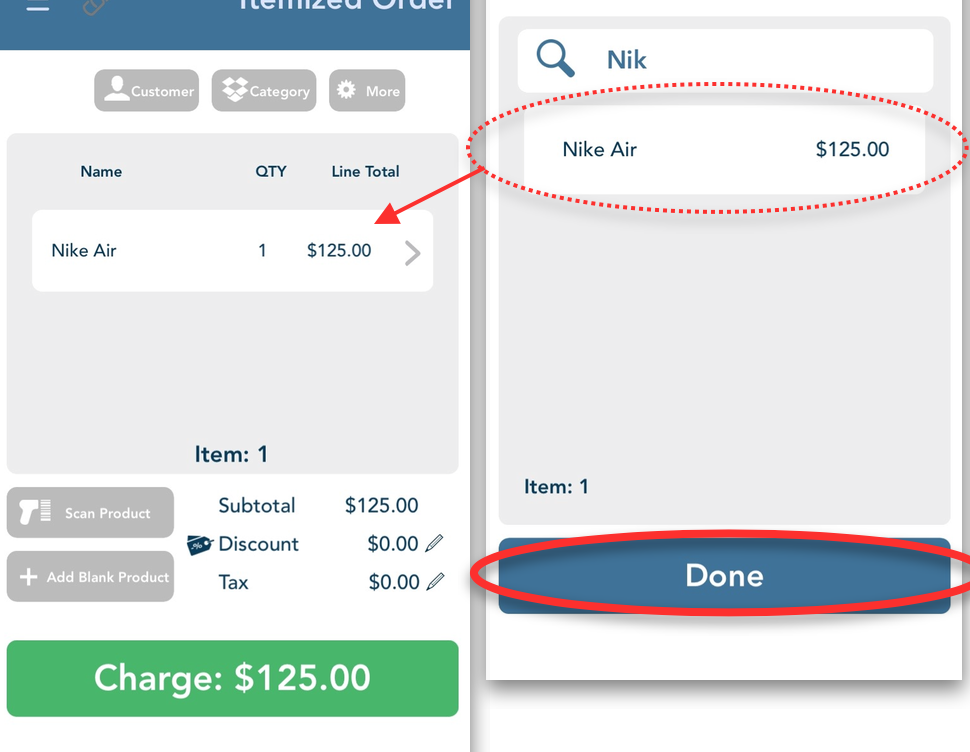
Search For A Product
To add a product using Open Search, type the product’s keyword in the open search field.
The list will automatically update all the products that match the criteria or keyword entered.
Tap on the product you wish to add, which will be added in Line Items list.
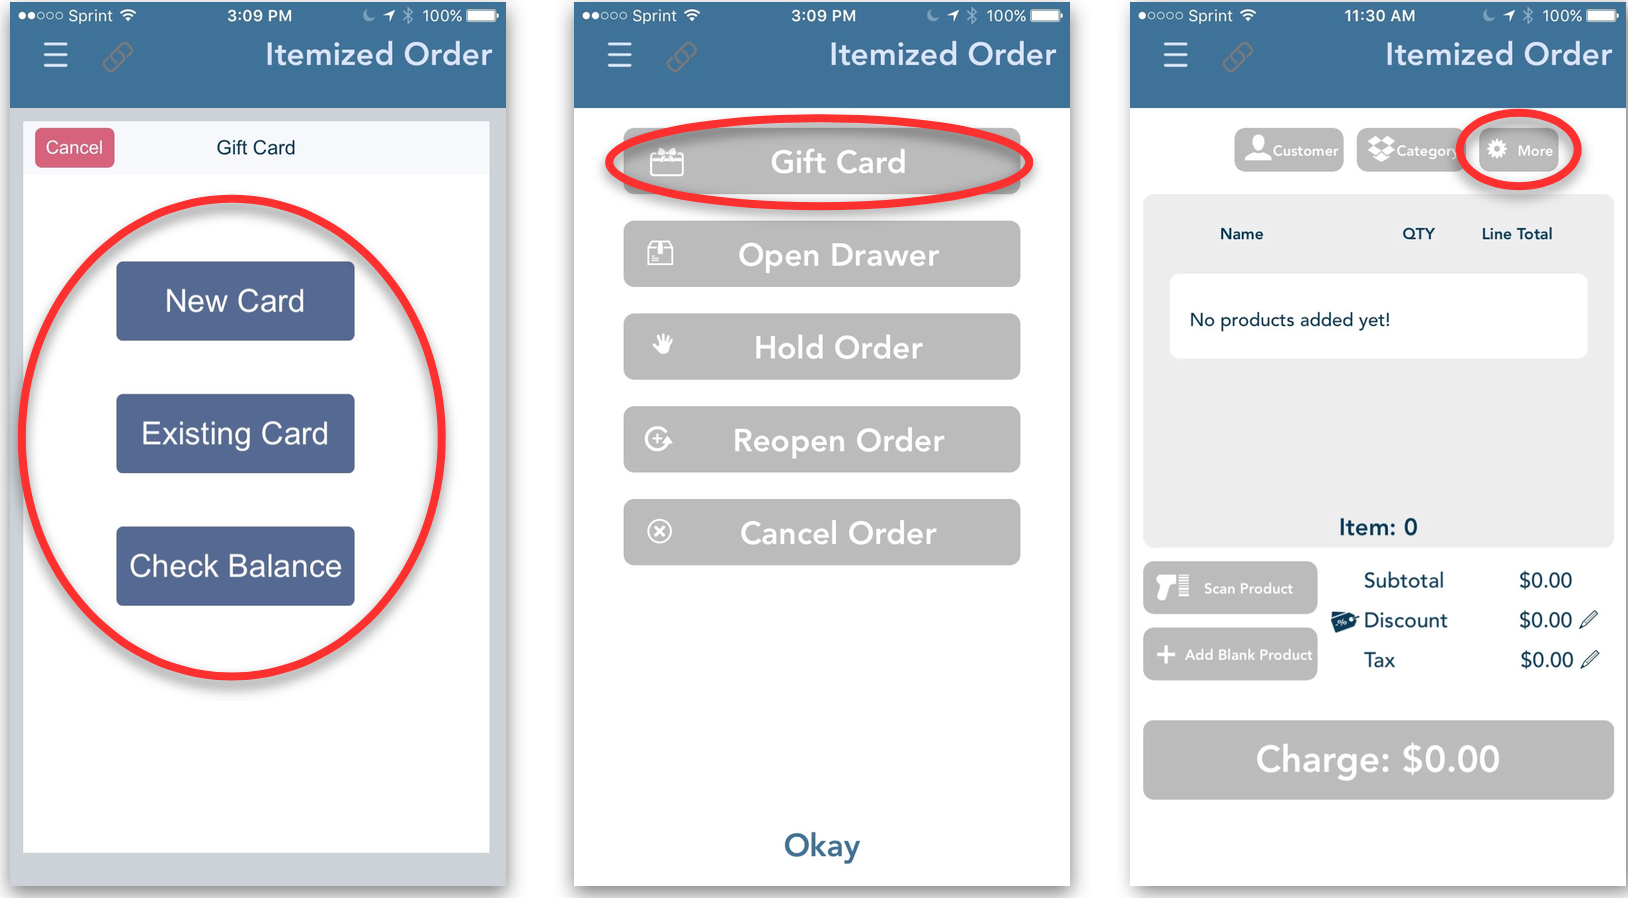
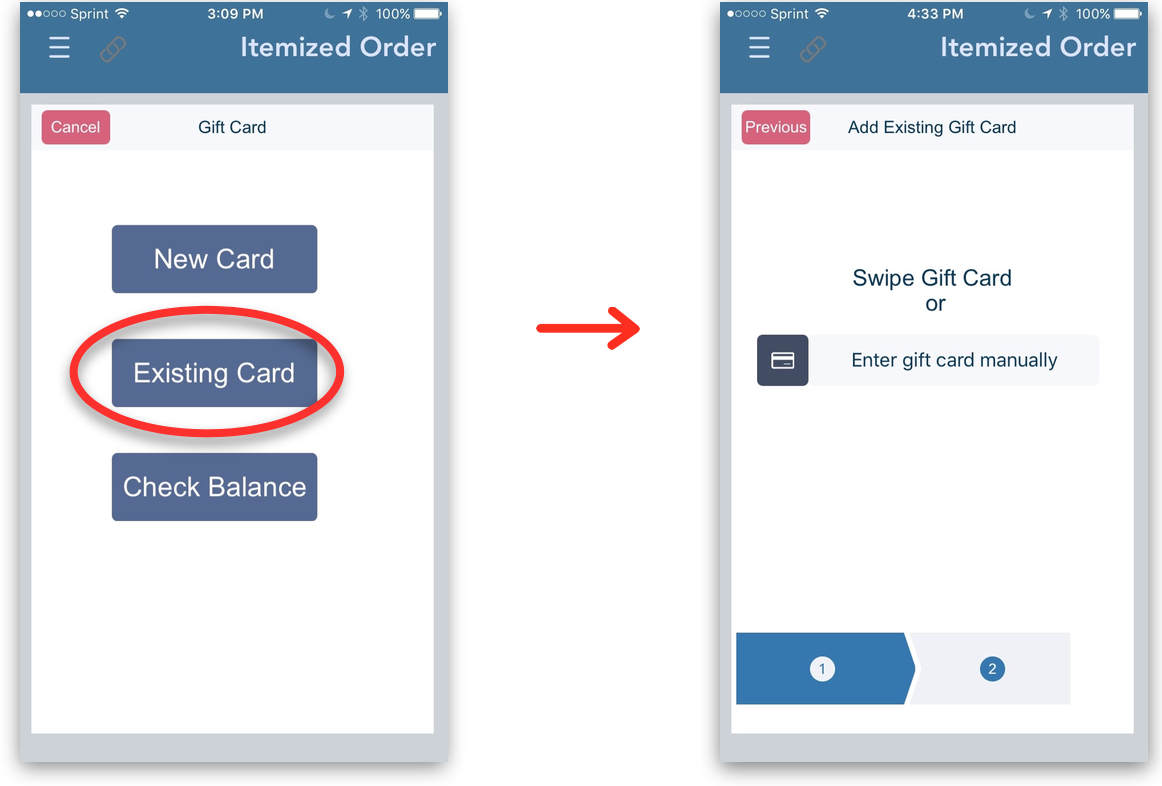
Gift Cards
The Retail POS App lets you add gift card sales to your Itemized Orders. To add a gift card, tap on "More" then tap on "GiftCard". Note: Only closed loop gift cards, or cards that can only be redeemed at the merchant listed on the the card, can be used.
A pop up window will appear, with the following options for action:
- New Card: Activate a new gift card.
- Existing Card: Add balance toto existing card.
- Check Balance: Check a gift card’s balance.
Note: The Gift Card feature can be used if your account is set up to accept closed loop gift cards. Contact your merchant service provider to start selling gift cards.
New Card
To add a new gift card to your order, tap "New Card". To add funds to your new gift card, you can either swipe the gift card or enter the gift card’s number manually.
To swipe the gift card, you must connect a card reader or swiper. Connect your card swiper, then swipe the new gift card. To enter the gift card’s number manually, tap on the ‘Enter Gift Card
Manually’ field then enter the gift card’s number.
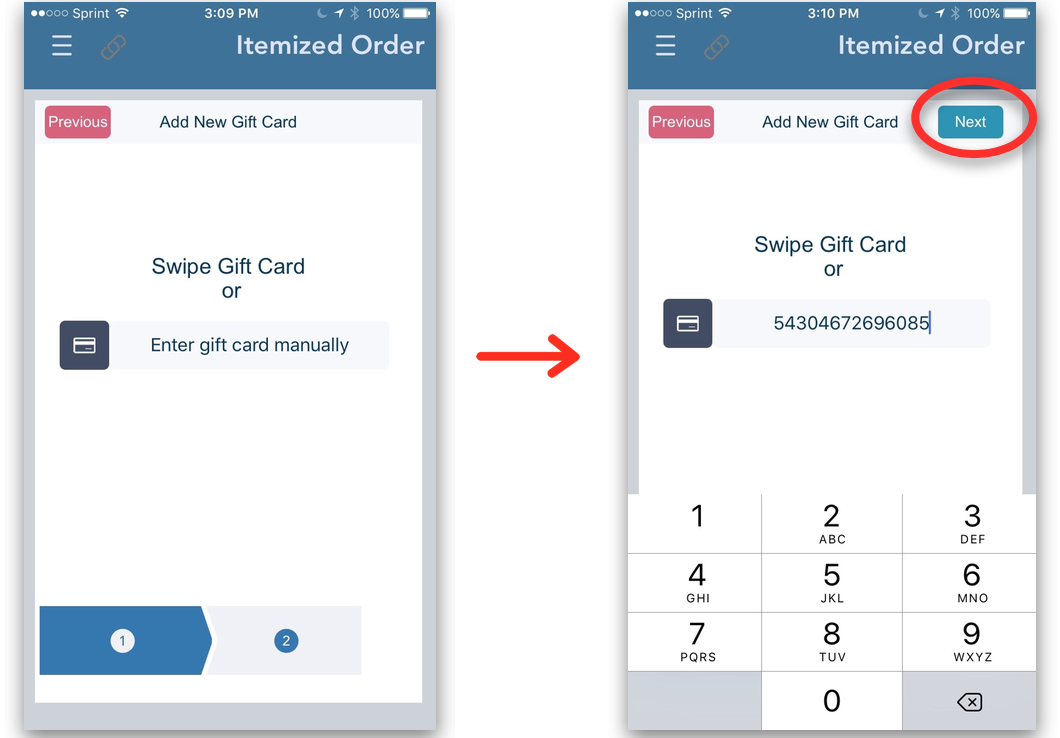
Tap "Next", located at the top right corner of the pop up, to proceed to the next step.
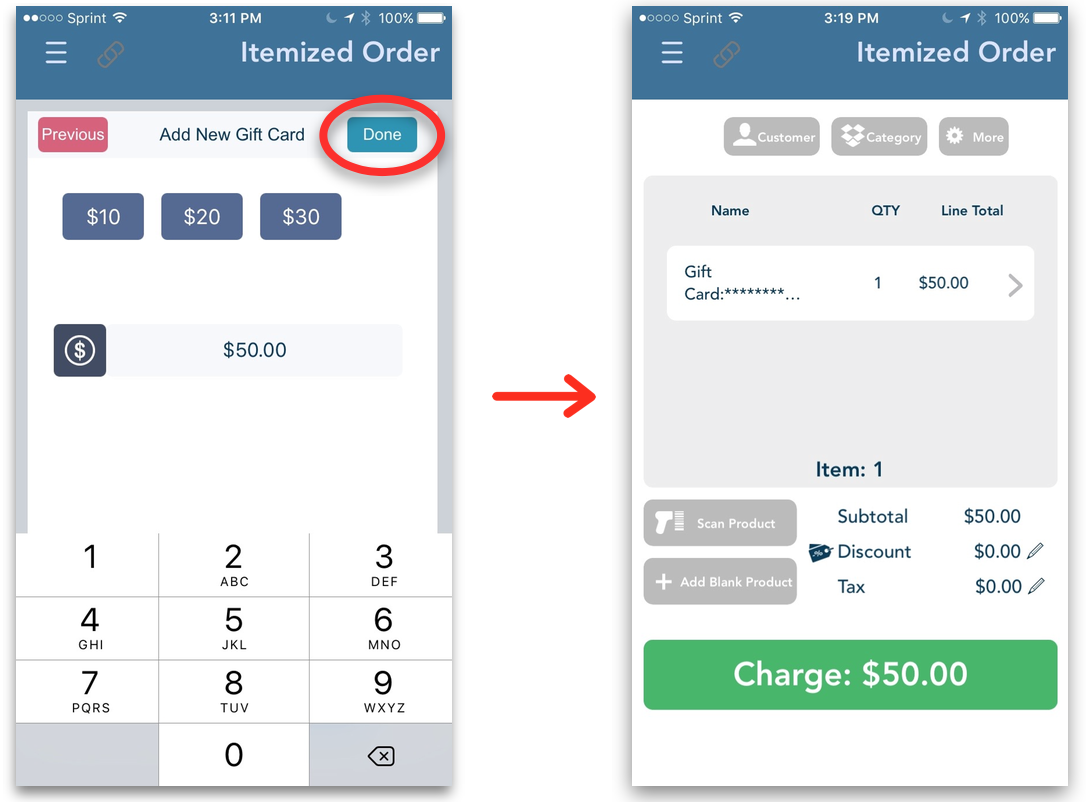
Choose the dollar amount you want to assign to the gift card: $10, $20, or $30. To enter a custom amount, tap on the ‘$0.00’ field then enter the amount.
Tap "Done" located at the top right corner of the pop up. The gift card will automatically be added to your line items list.
Note: The gift card will be activated once the Itemized Order transaction is paid.
Existing Card
To add more funds to an existing gift card, tap on "Existing Card" . You may swipe or manually enter the existing gift card’s number.
To swipe the gift card, you must connect a card reader or swiper. Connect your card swiper, then swipe the new gift card.
To enter the gift card’s number manually, tap on the ‘Enter Gift Card Manually’ field then enter the gift card’s number.
On the next screen, choose the dollar amount to be added to the gift card: $10, $20, or $30. To enter a custom amount, tap on the dollar amount ‘$0.00’ field. Once you enter the amount, the current balance of the card will be displayed with the new balance. Tap on "Done" to add the new gift card balance to the Line items of the itemized order transaction.
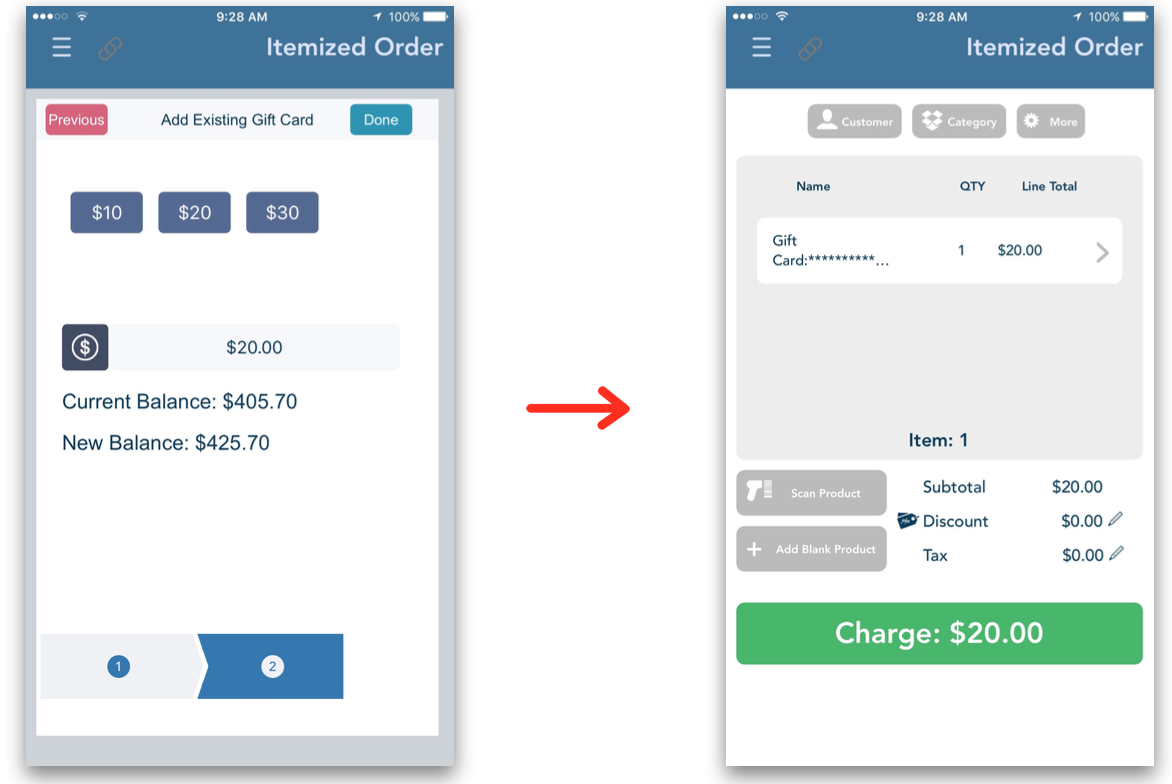
Note: The new balance will be activated once the Itemized Order transaction is paid. Also, if a customer decides to transfer ALL funds from Card A to Card B, Card A will be disabled and cannot have funds added to it in the future. Check Balance
To check a gift card’s balance, tap on "Check Balance". Swipe the gift card or manually enter the gift card’s number on the field provided.
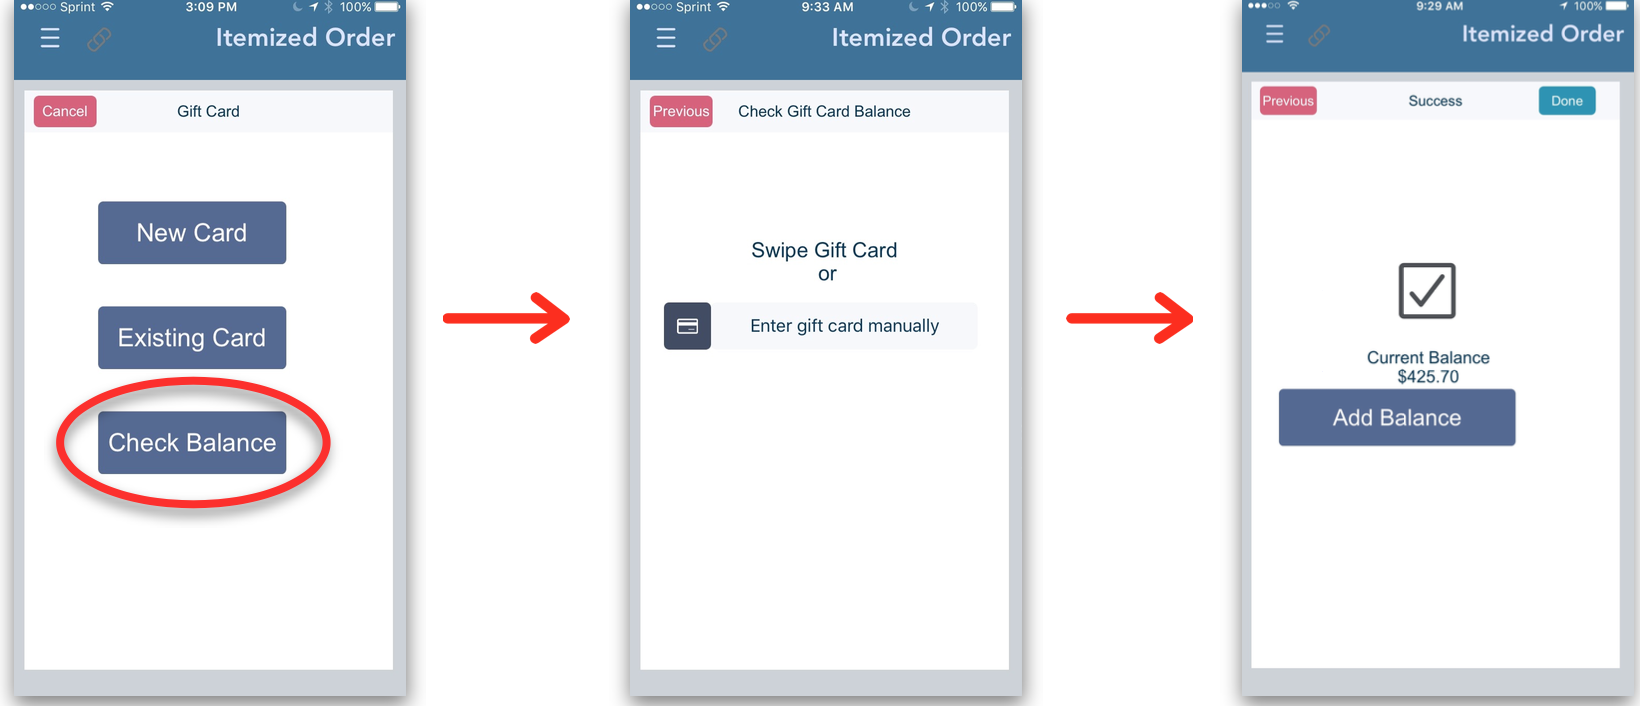
Once you swipe or enter the gift card’s number, tap "Next". The next screen will display the card’s current balance, and give you an option to add funds to the card.
To add more funds to the existing gift card, tap "Add Balance" . Otherwise, tap on .
Note: The funds added to the existing card will be added to the Line Items of the itemized order transaction.
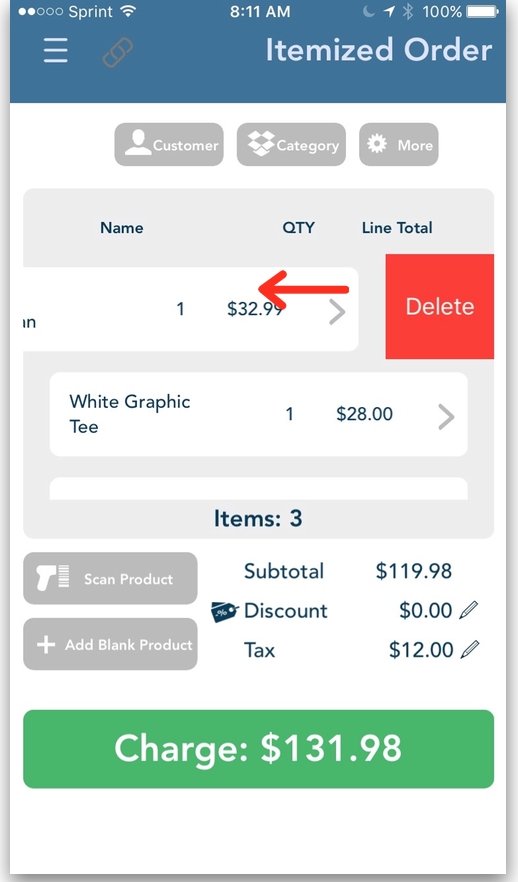
Delete Line Items
To delete products from your Line Items list, swipe the product to the left, then tap ‘Delete’.
Step 2: Add Discount or Tax
The Retail POS app allows you to add discounts and tax to individual products in your line items list or to the entire order.
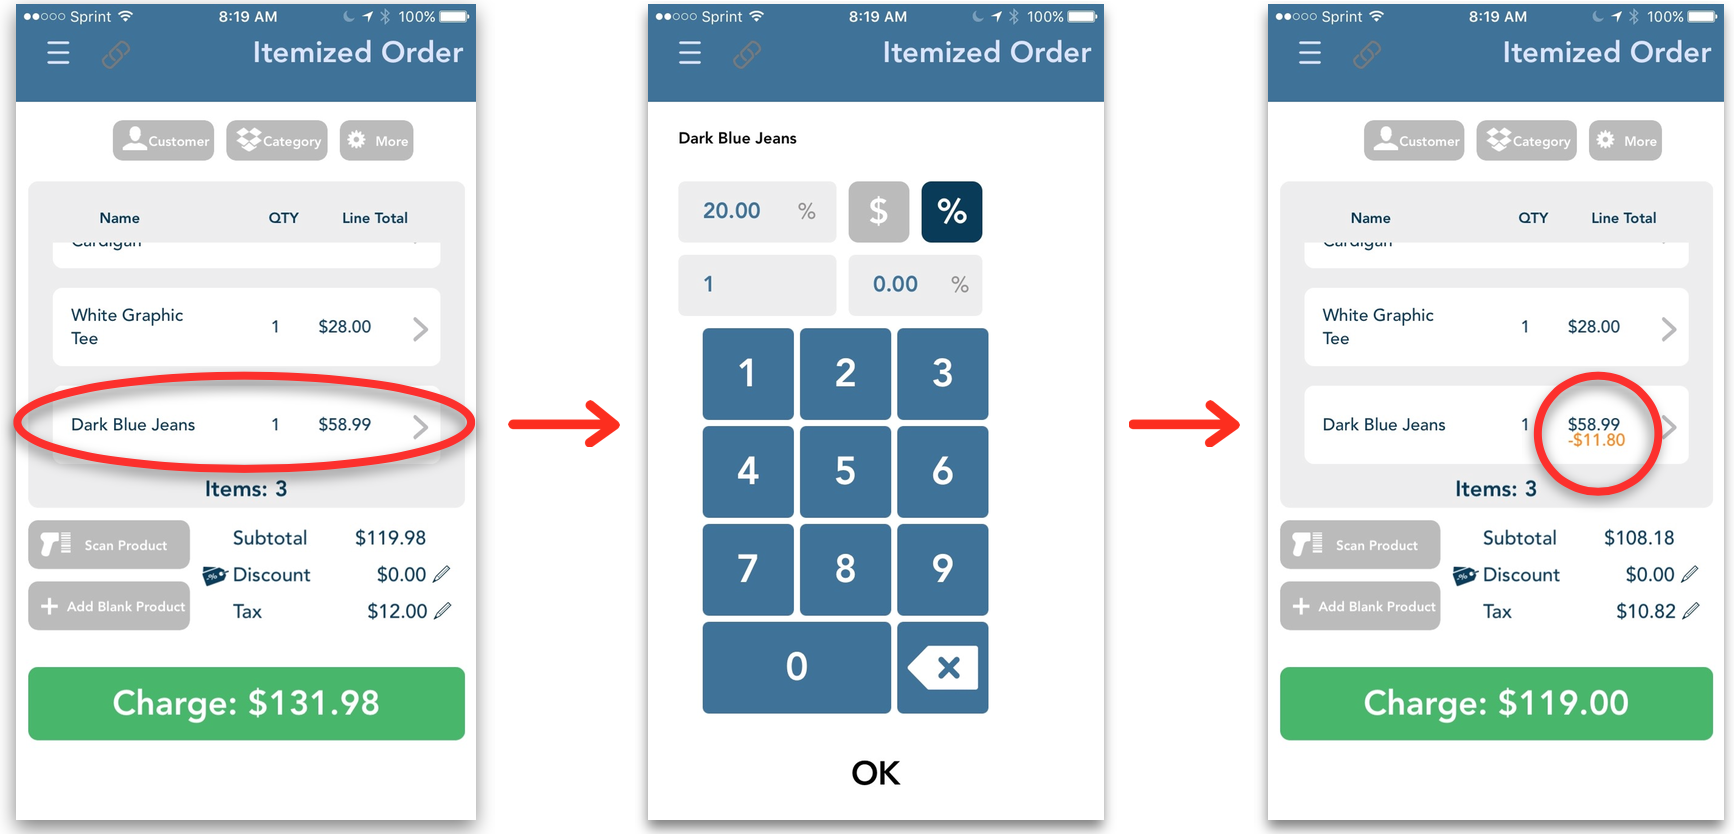
Apply Discount or Tax to Individual Product
Tap on the product you wish to discount or tax, a pop up window will appear. You may enter the discount or tax in a dollar amount or percentage. Tap on the ‘Discount’ field to apply the enter the discount. Tap on the ‘Tax’ field to enter the tax.
Tap ‘OK’ to apply the discount and tax to the product. Discounts will be shown in the calculation as orange, and Tax will be shown as green. To delete the discount or tax on
individual products, tap on the product and delete the entered values from their corresponding fields.
Apply Discount or Tax to Entire Order
To apply discount or tax to your entire order, tap on the pencil ( ) icon on the subtotals section.
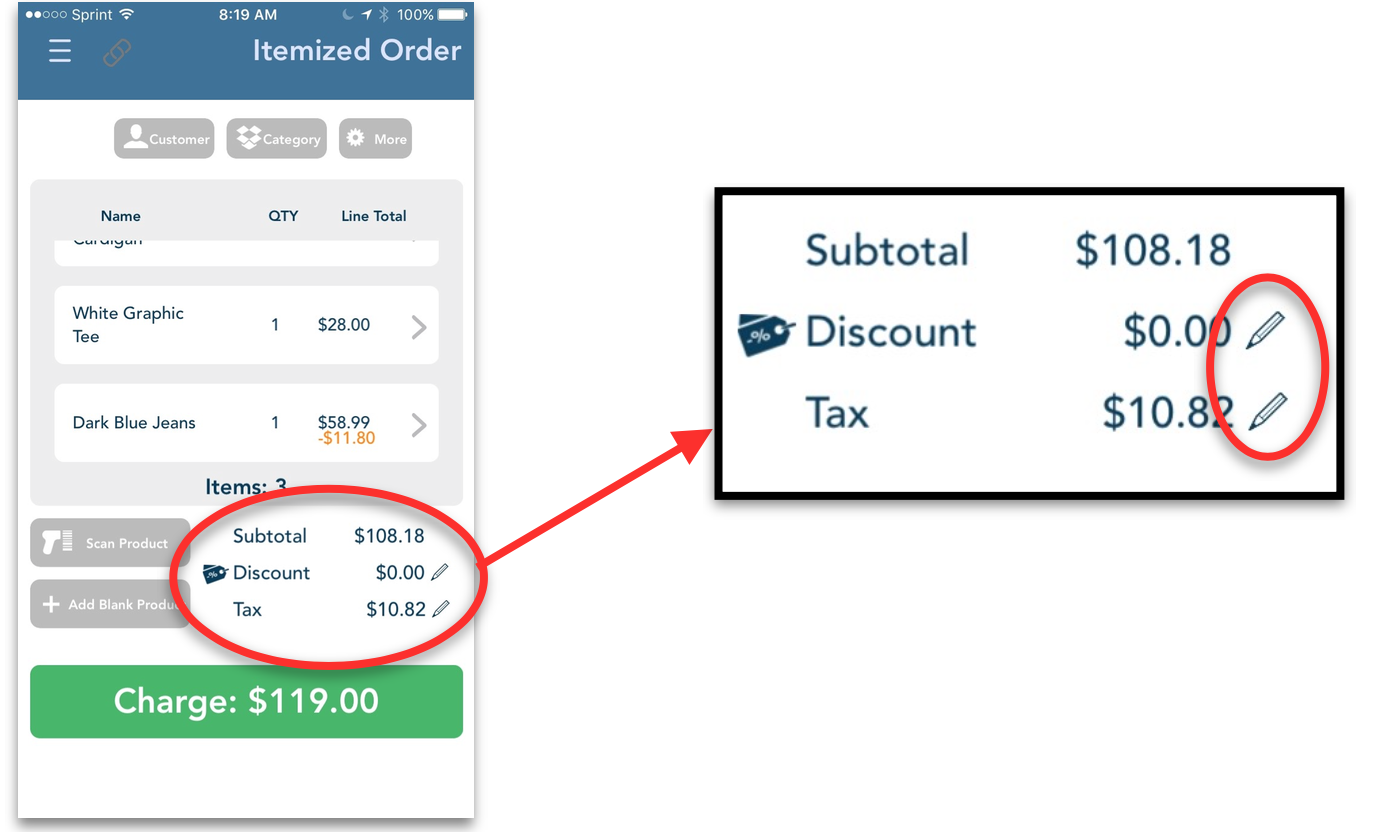
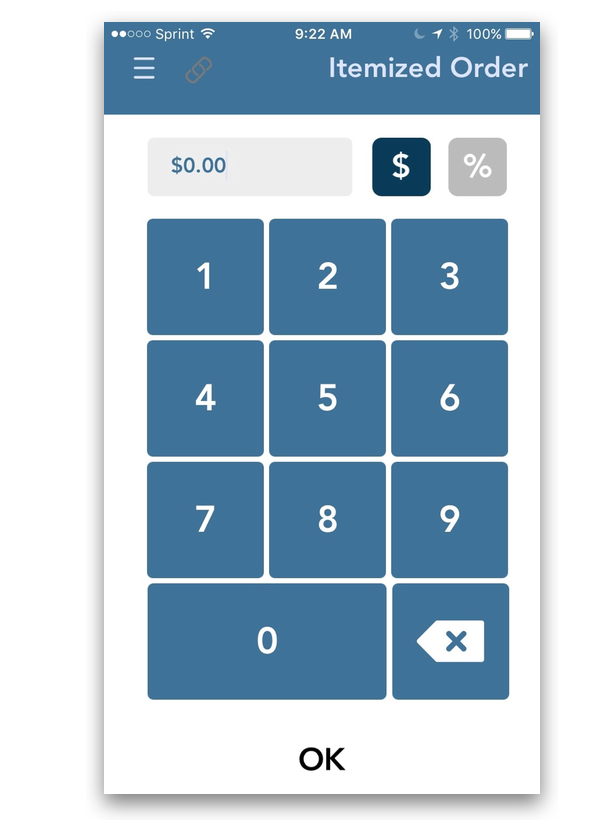
Once you tap on the pencil icon, enter the discount or tax in the provided field. Enter the amount, in dollar or percentage form, using the number key pad. Once you have entered the amount, click ‘OK’.
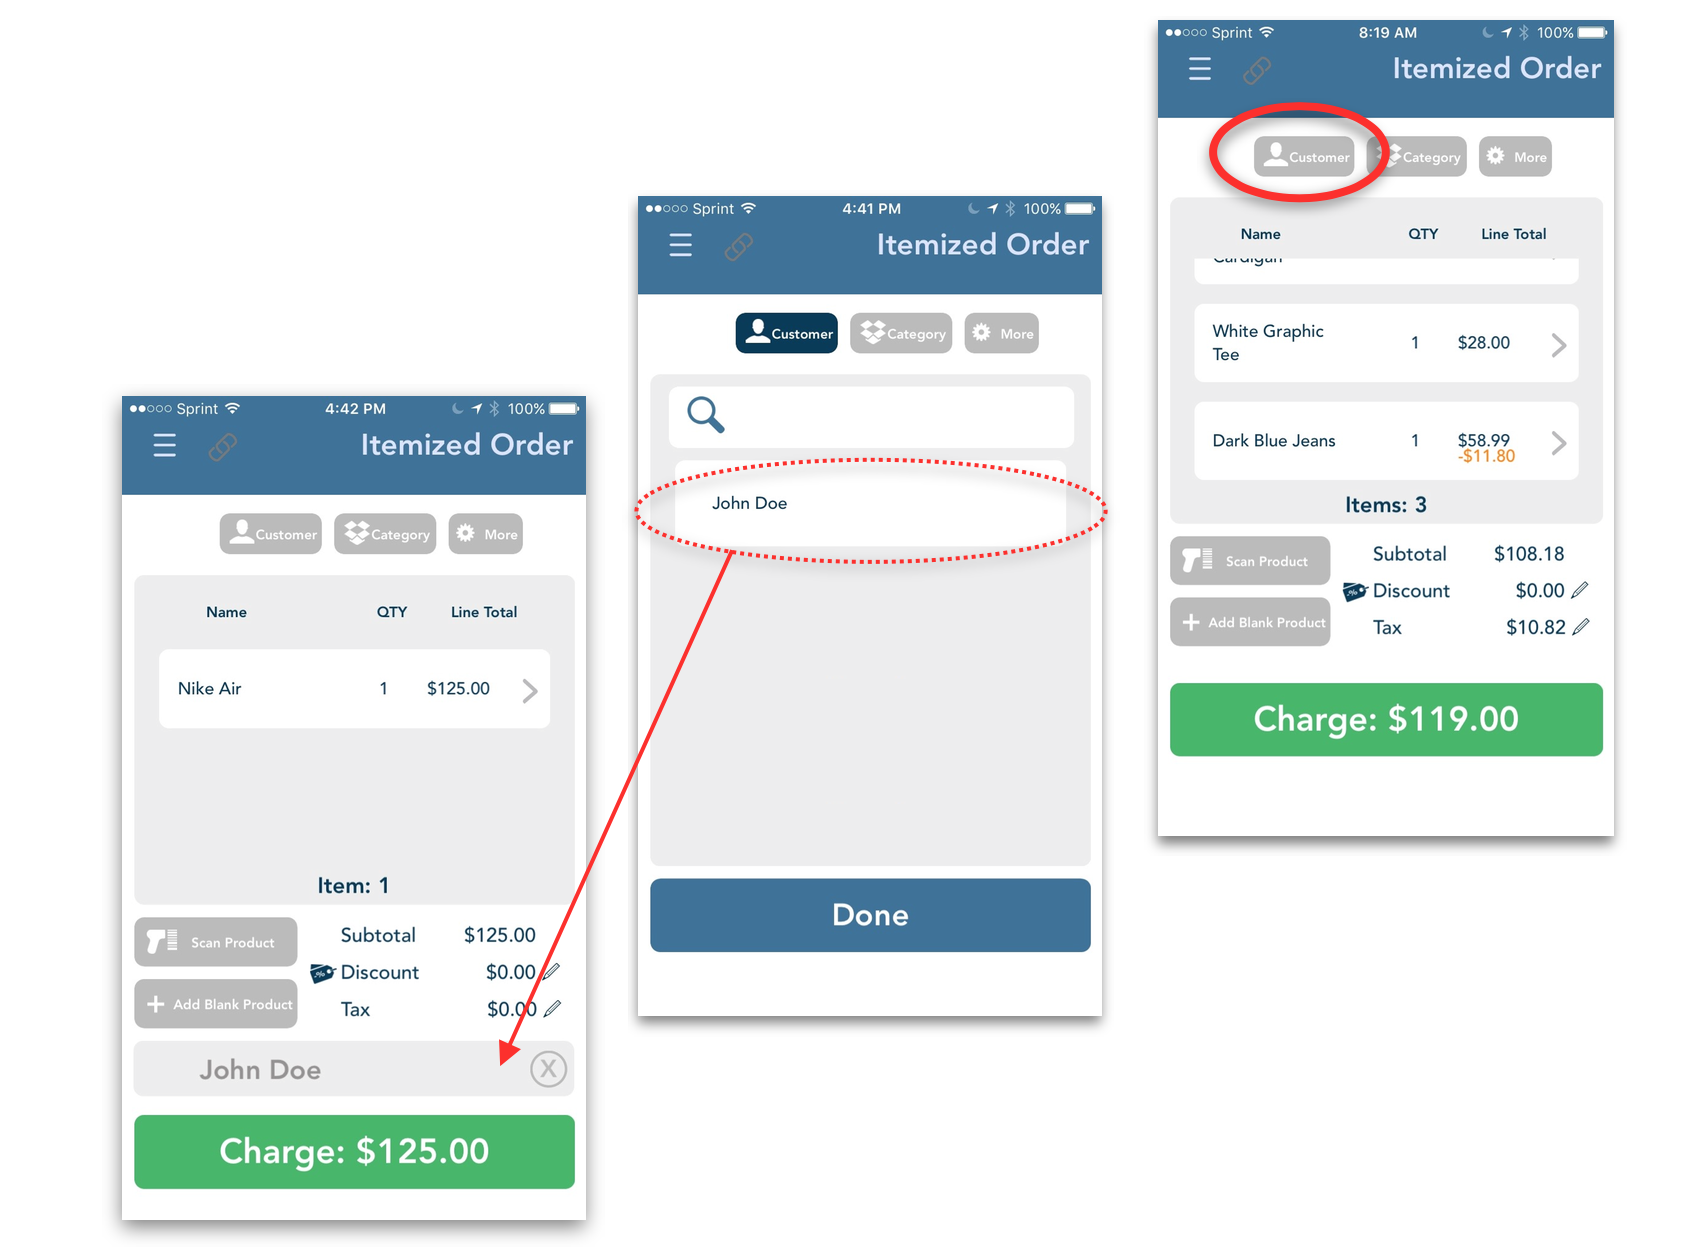
Step 3: Select Customer
To select a customer from your database, tap "Customer". Tap the name of the customer for whom the order is to be placed.
You may also search for the customer by entering the customers name in the field provided. Every customer that match the criteria entered will be displayed and listed.
Note: You may only select one customer per order. Once you tap on the Customer’s Name, it will be added below the Subtotal, Discount, and Tax section.
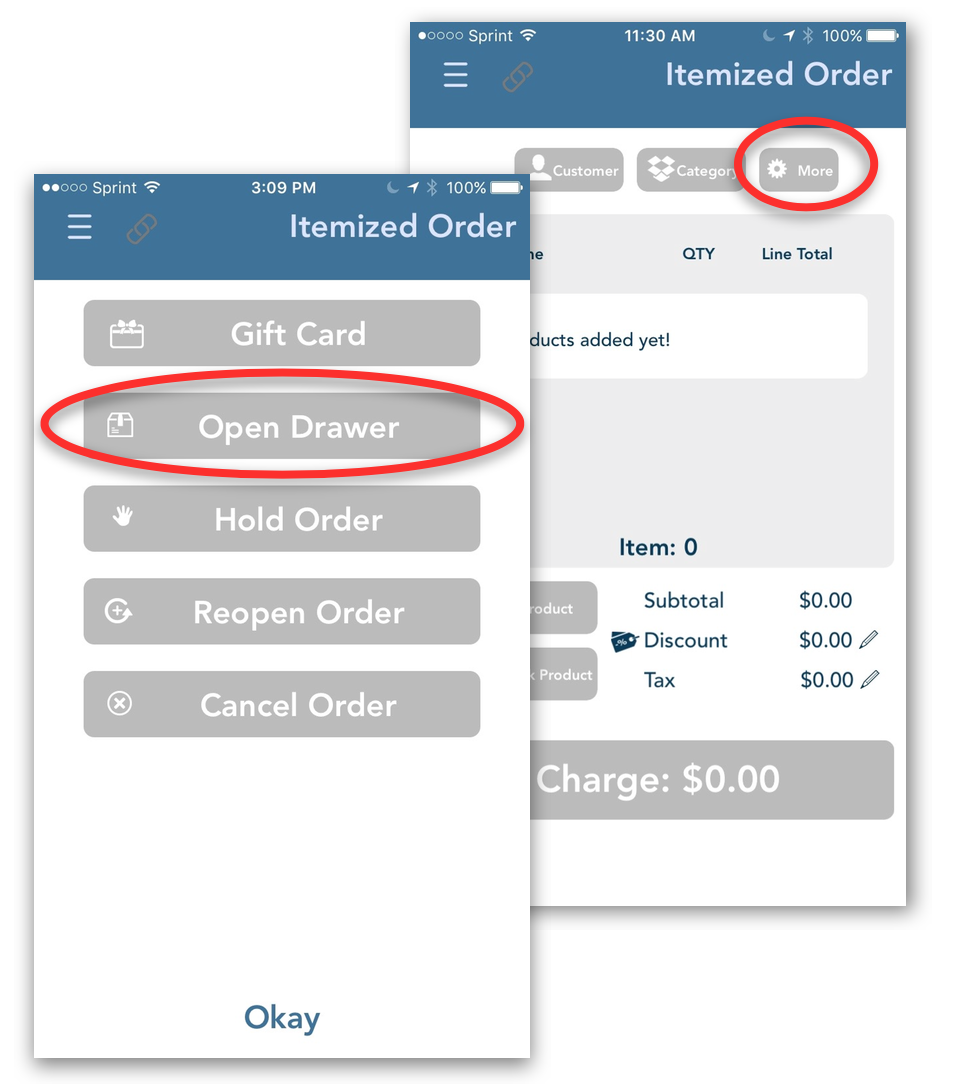
Open Drawer
To open the cash drawer, tap on "More" then tap on "Open Drawer".
The Retail POS App is compatible with the mPOP Bluetooth printer, and the TSP Printer (includes Ethernet), which both include cash drawers.
The Open Drawer feature allows you to open your cash drawer without any purchase.
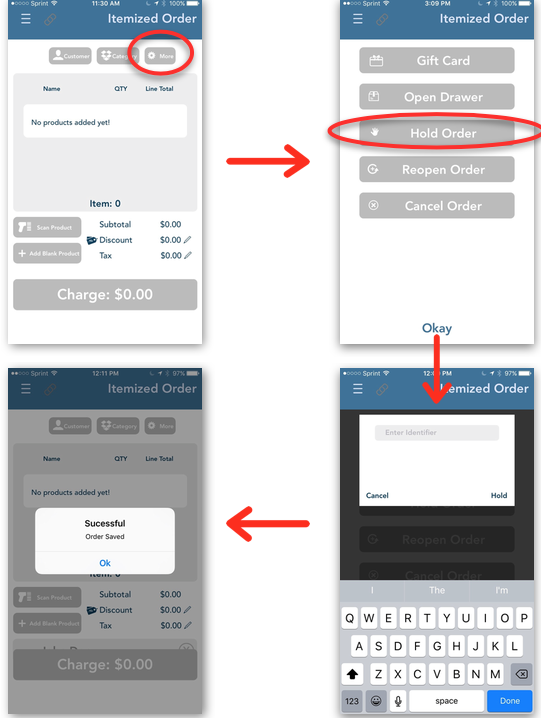
Hold Order
To hold an order, tap on "Hold Order", The identifier pop window will appear. Enter an identifier for the order in the “Enter Identifier” field then tap on ‘Hold’. A pop up window will then appear to confirm if the order was saved.
Reopen Order
To re-open your order, tap on "Reopen Order". Tap on the order you wish to re-open from the list.
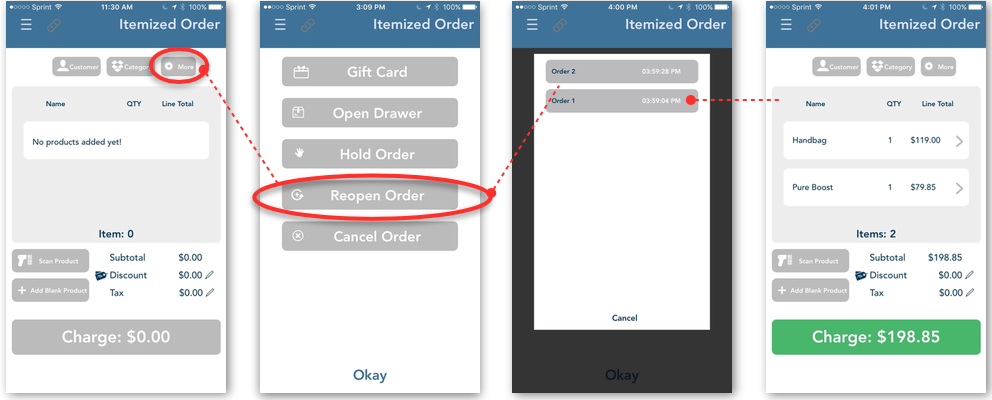
Once you tap on the order, you will then be taken to the selected order’s Itemized Order page.
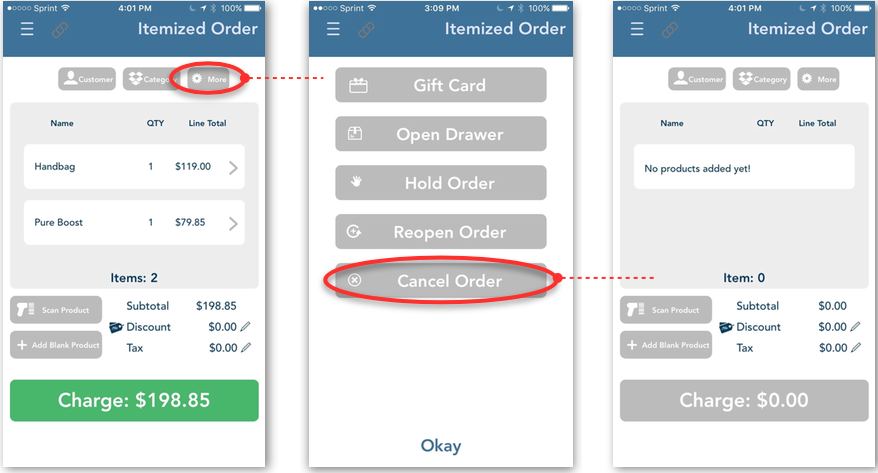
Cancel Order
To cancel your order, tap on "More". Tap on "Cancel order". The order will automatically clear out and deleted from the Hold Order list.
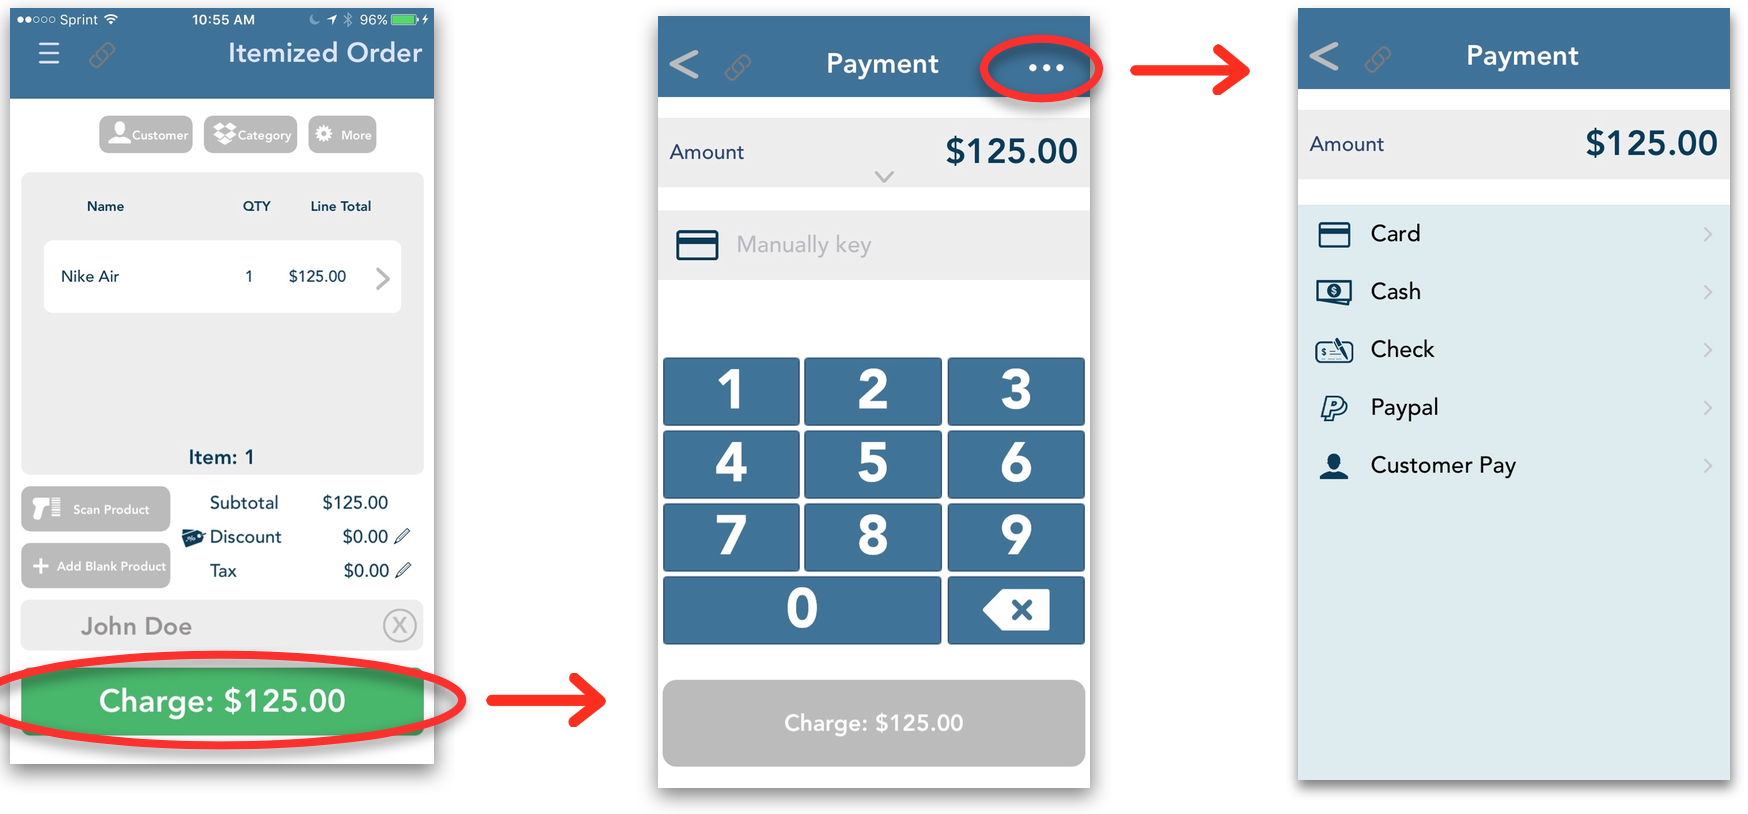
Step 4: Choose Payment Method
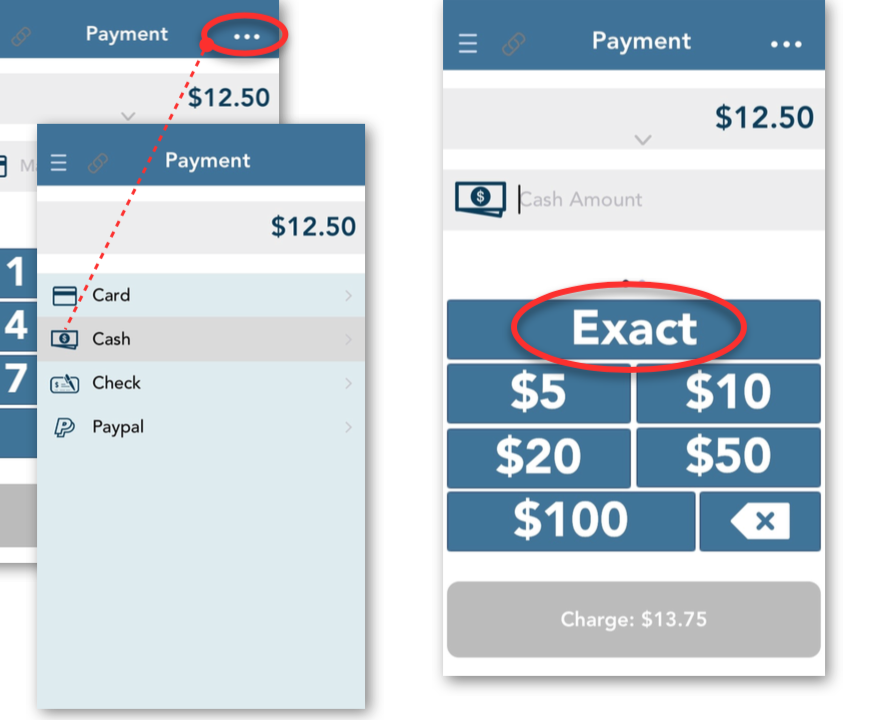
Cash
To process a cash transaction, enter the Amount Tendered in the ‘Cash Amount’ field. Note: The amount tendered must be equal to or higher than the total amount of the order. The customer’s ‘Change Due’ will automatically be calculated for you. To enter the amount tendered you can do one of the following:
-
Tap on the dollar amount keypad to enter the amount tendered.
-
Tap on "Exact" when the customer gives the exact amount of the amount due.
Credit Card
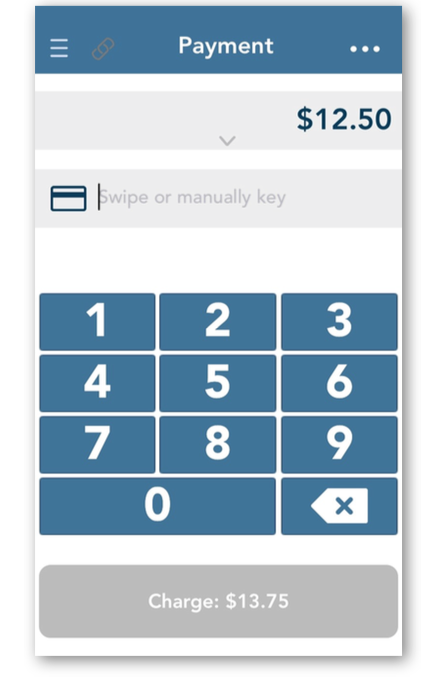
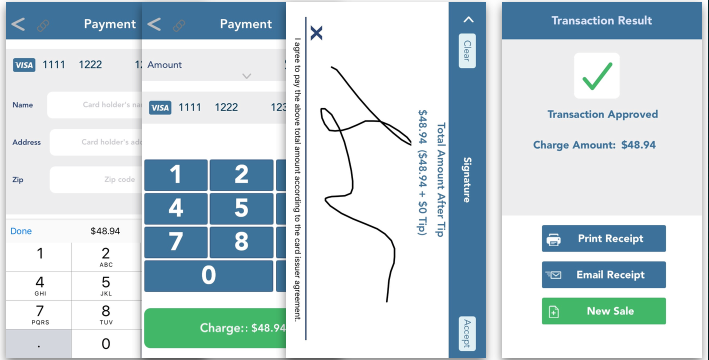
When processing a credit card transaction, you may swipe the customer's credit card or manually enter the customer's credit card information.
Manual Entry
To enter a customer’s credit card information manually, tap on the “Manually Key” field. Enter the 16-digit credit card number. Once the card number is entered, new fields will appear. Enter the credit card’s expiration date, CVV/CVV2 code, the Card Holder’s name, Address, and Zip Code.

Once you have entered the necessary information, tap "PAY" to process the credit card transaction.
Swipe
To swipe a customer’s credit card, you must enable and connect a card reader to your iOS device. The following is a list of card readers that are compatible with the USAePay Retail POS App:
- PaysaberGo
- PaysaberShuttle
- WoosimR-240
- IngenicoiCMP
- MagtekiDynamo
A pop up icon will appear to confirm a card reader is connected. Refer to image shown below.
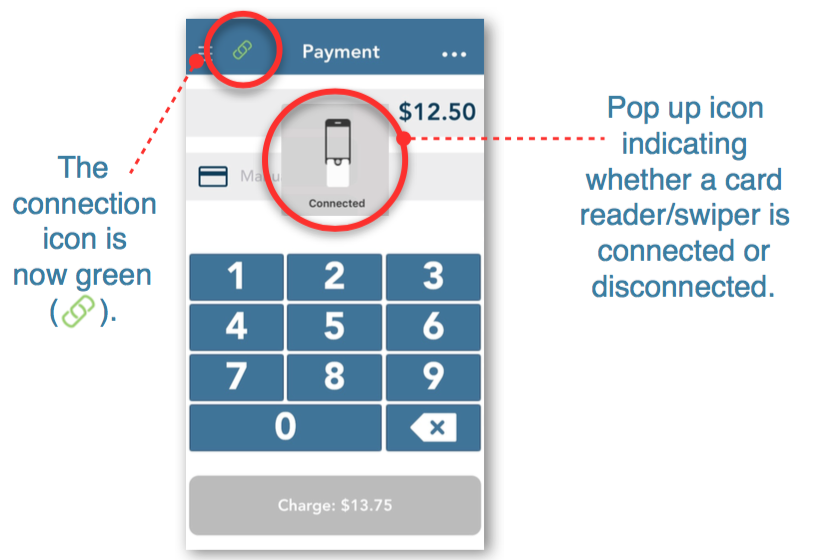
As soon as any card reader is connected, you may automatically swipe the customer’s credit card. The Quick Sale transaction will start processing once the card is swiped. You will then be directed to the Tip Page.
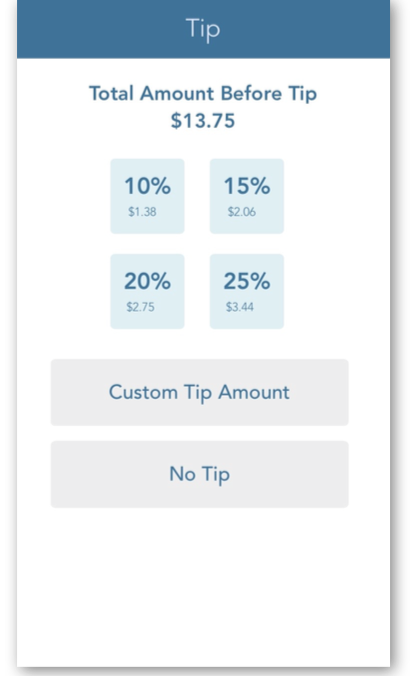
Add Tip
Add tips to your Quick Sale transactions, the ‘Prompt for Tip’ setting must be enabled in Settings.
When adding tips, customers are given the option to add 10%, 15%, 20%, 25%, a Custom Tip, or No Tip.
Capture Signature
The Signature page will show a calculation of the Quick Sale amount, including tax and tip. When this window appears, ask the customer to use the touch screen and enter their signature.
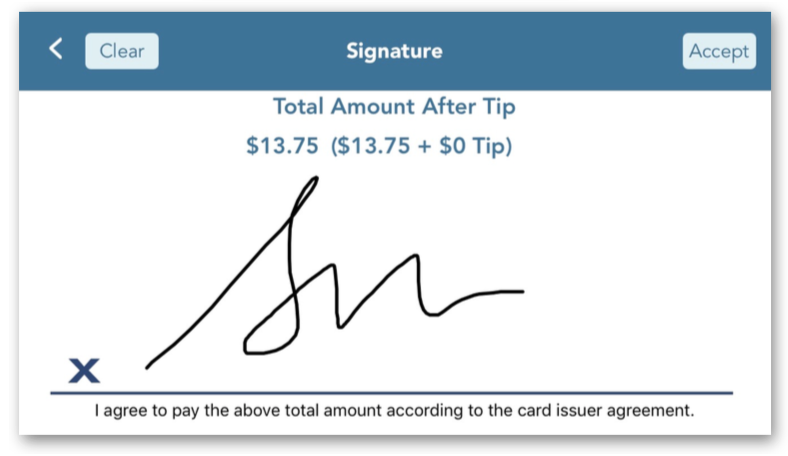
Once the customer signs their name on the screen, tap "ACCEPT".
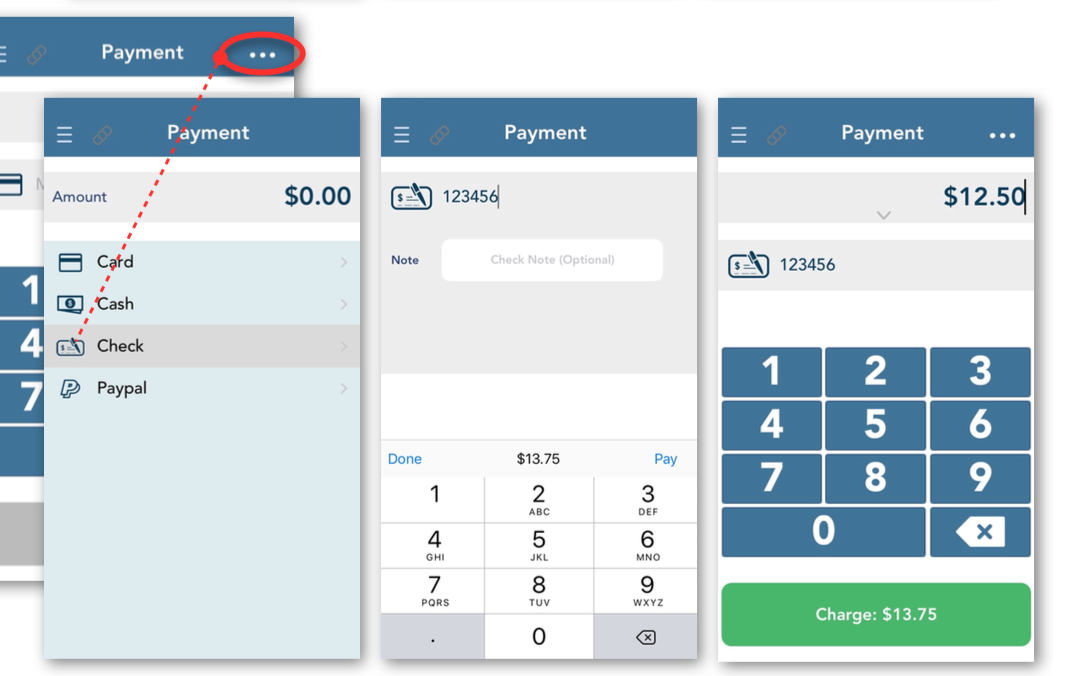
Checks
To start accepting checks, it must be enabled in Settings. When accepting checks, enter the check number in the ‘Check Number’ field.
Enter a note in the ‘Check Note’ field, if desired. Note: You do not need to enter the exact check number. You may use the ‘Check Number’ field to keep track of your check sales for the day.
Once you have entered the check number, tap on "Charge"
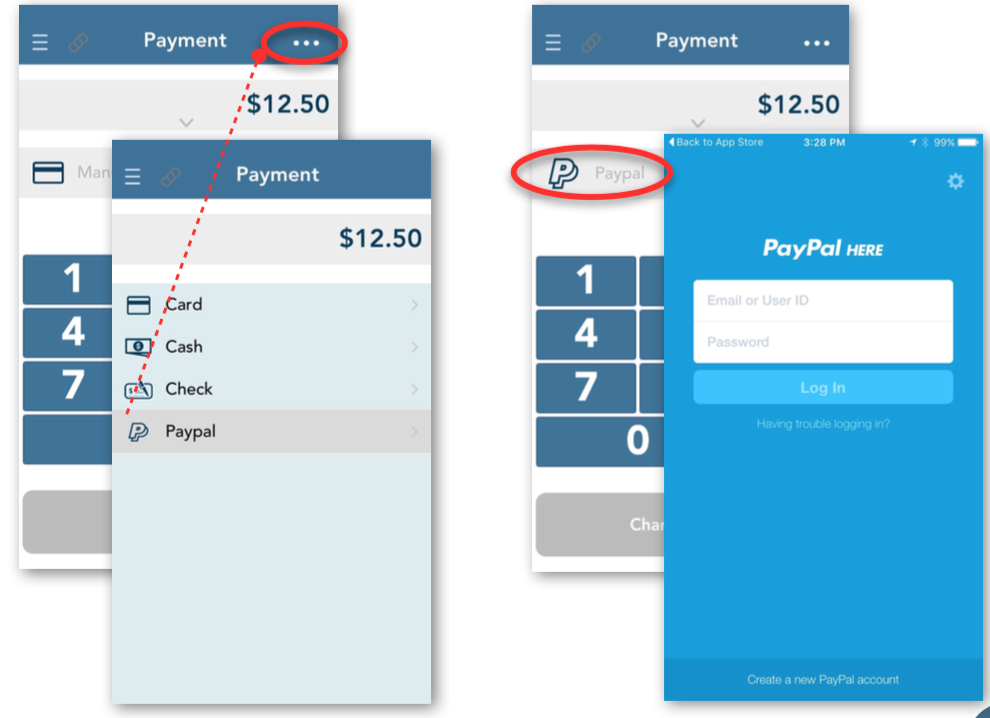
Paypal
To accept PayPal, you must enable it in your Settings. When accepting a PayPal payment method, tap the ‘Paypal’ field. You will be directed to the Paypal Here application.
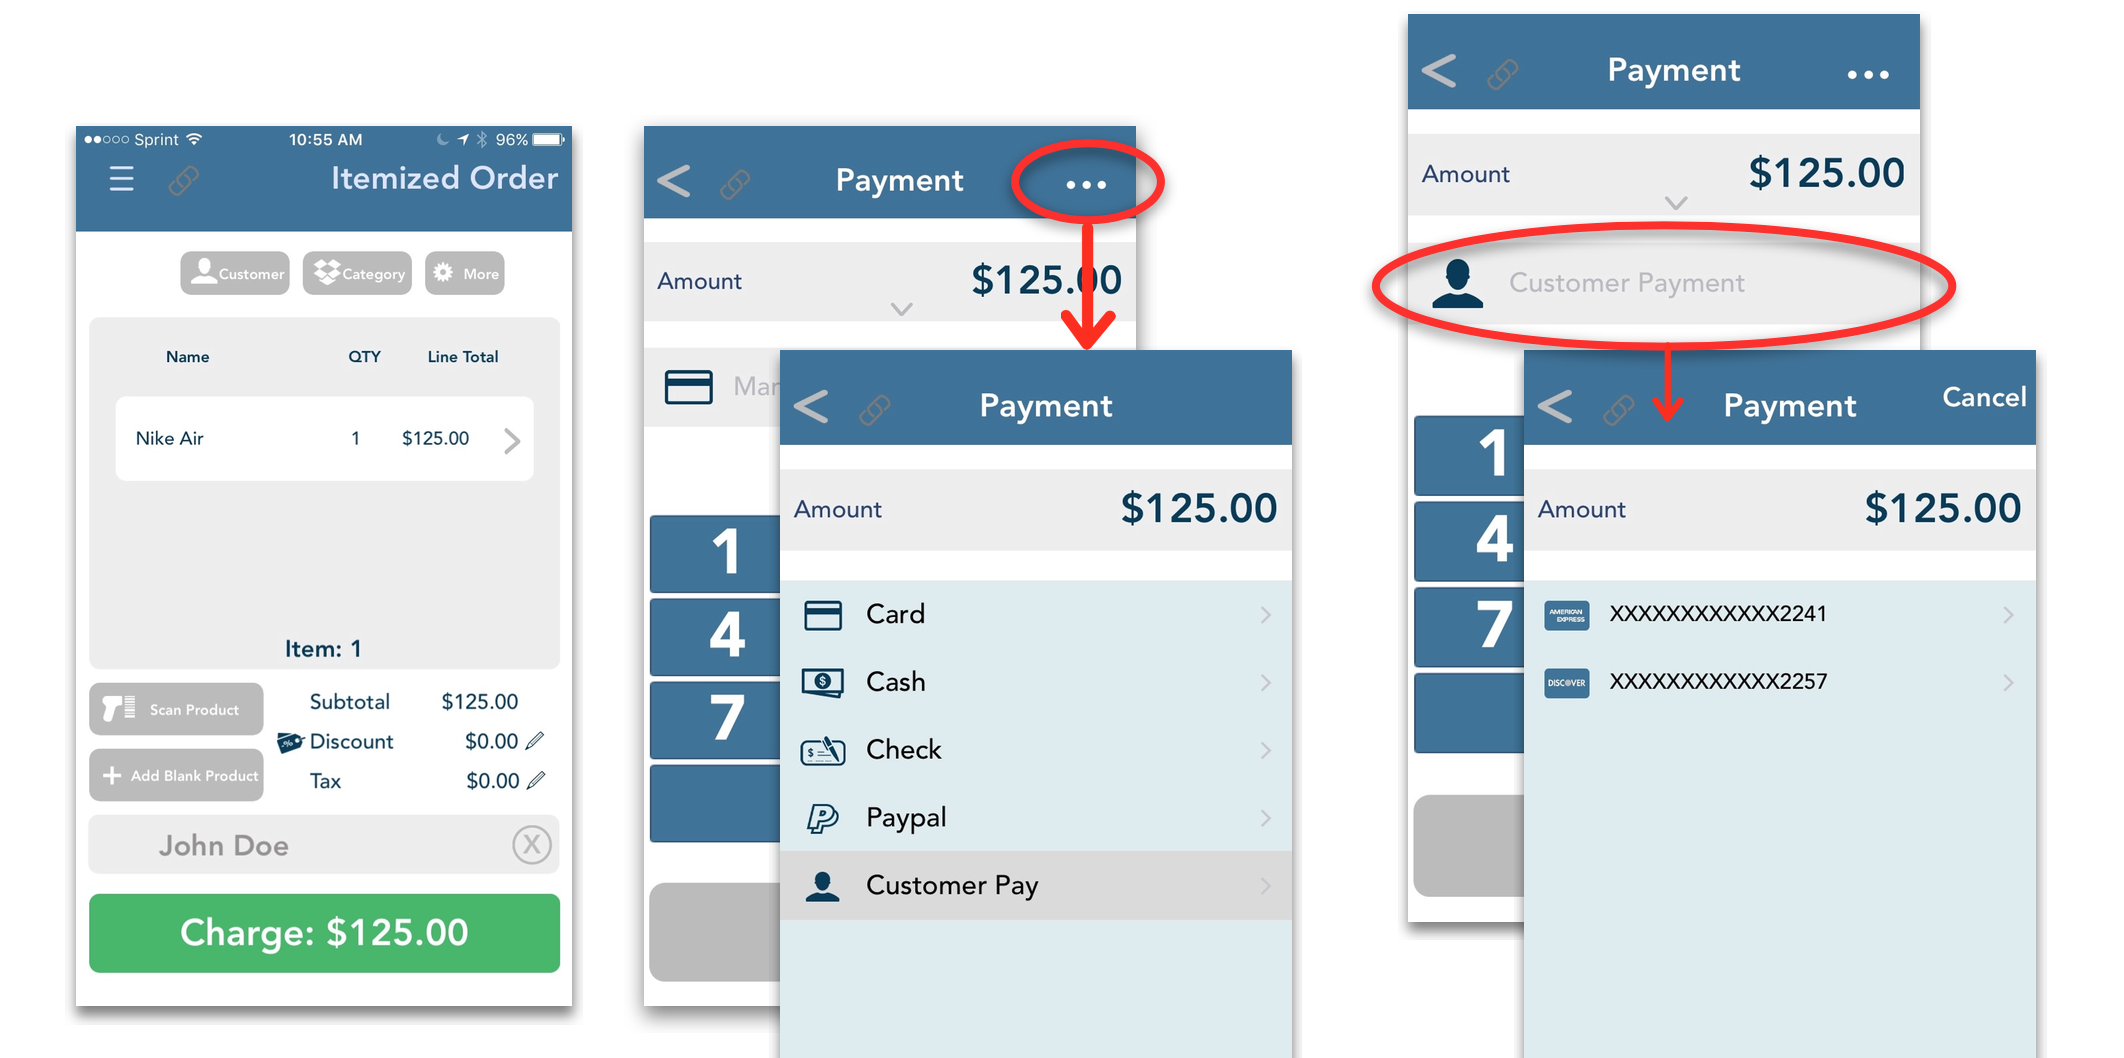
Customer Pay
Conduct payments with customer information previously saved from before. Tap on the field to view all saved credit card information for a specific customer.
Note: Customer credit card information can only be saved in the Merchant Console.
Partial Payment
The Retail POS App allows you to also process partial payments. For example, if the customer would like to pay part of the transaction with cash and the rest with card.
To complete a transaction with two payment methods in Itemized Order, tap on to open the ‘Payment’ Screen.
Tap on the three dots in the top right corner to select the form of payment.
Tap on "Cash" then select the amount or manually key in the amount of cash tendered. Tap on " Charge."
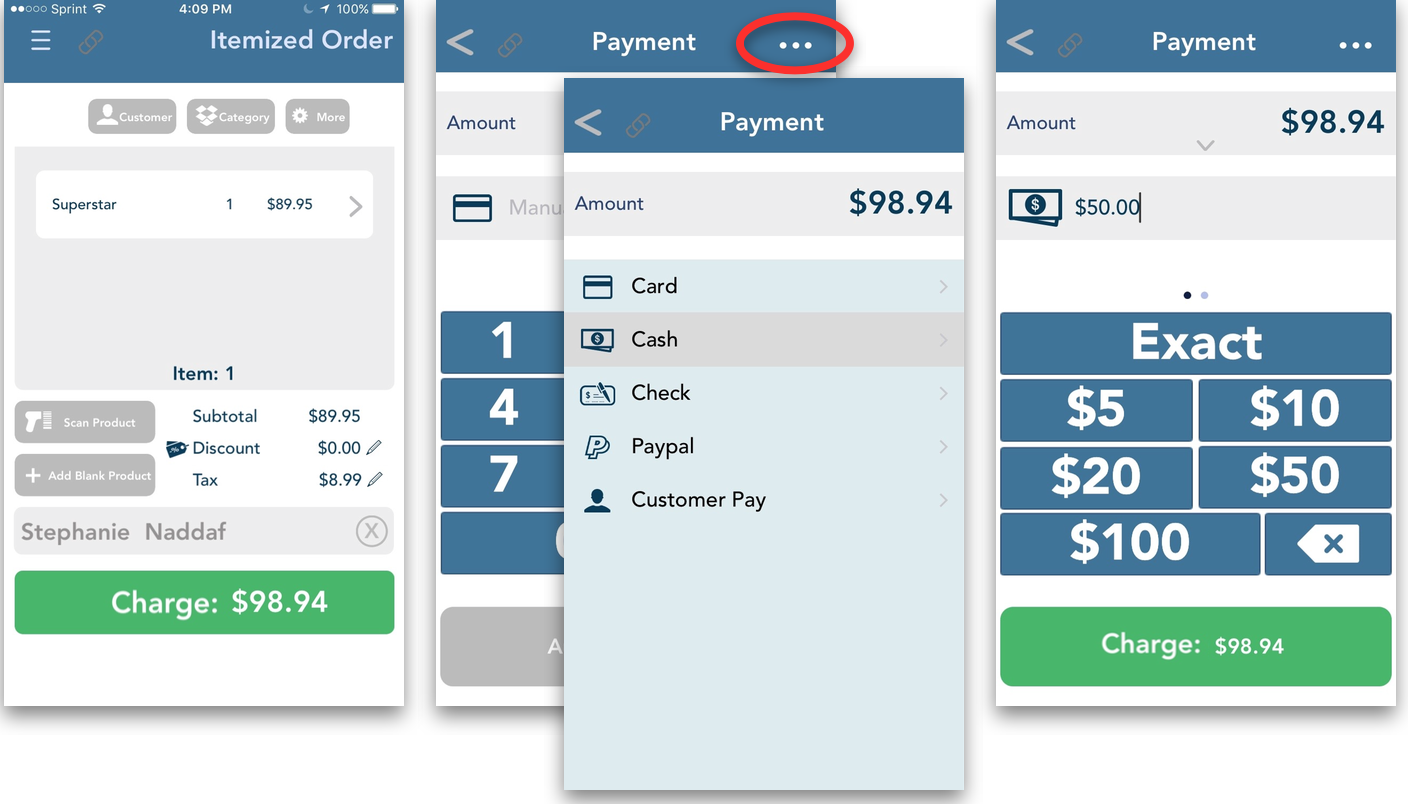
A confirmation of the amount paid will appear along with the amount that is still due for payment.
Tap on "Continue Side" to continue processing the transaction. The Itemized Order Transaction Screen will now display the amount that has already been paid.
Tap "Charge" on to open the ‘Payment’ Screen. Select the second form of payment that the consumer would like to use to complete the transaction.
Fill in the necessary information to complete the remaining portion of the transaction.
A confirmation of the amount paid will appear, completing the transaction.
Note: Transactions can only be completed with no more than two types of payment methods.
Step 5: Transaction Result
From the same Transaction Result page, you have the following options: Print Receipt, Email Receipt, and New Sale.
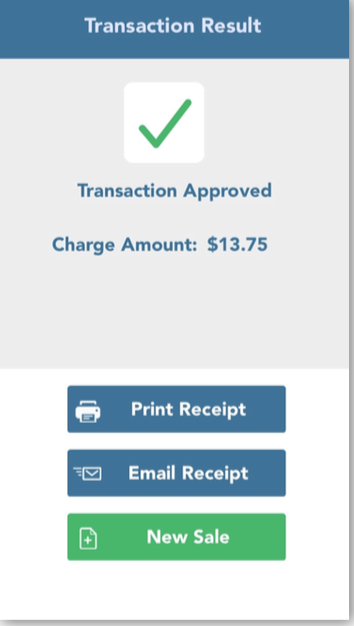
To print a receipt copy of the transaction, tap on "Print Receipt". A printer must be enabled and connected to your device. The following lists printers that are compatible with the USAePay Retail POS App:
- TSP Printer 100/LAN 143 & 650(via Ethernet connection for both printers) with cash drawer compatibility on both printers
- mPOP Bluetooth Printer with cash drawer
- Woosim Printer
- Seiko Qaliber Printer
To email a receipt of the transaction to your customer, tap on from the same Transaction Result page. You will be taken to the Email Receipt page. Enter the customer’s email address in the field provided then tap.
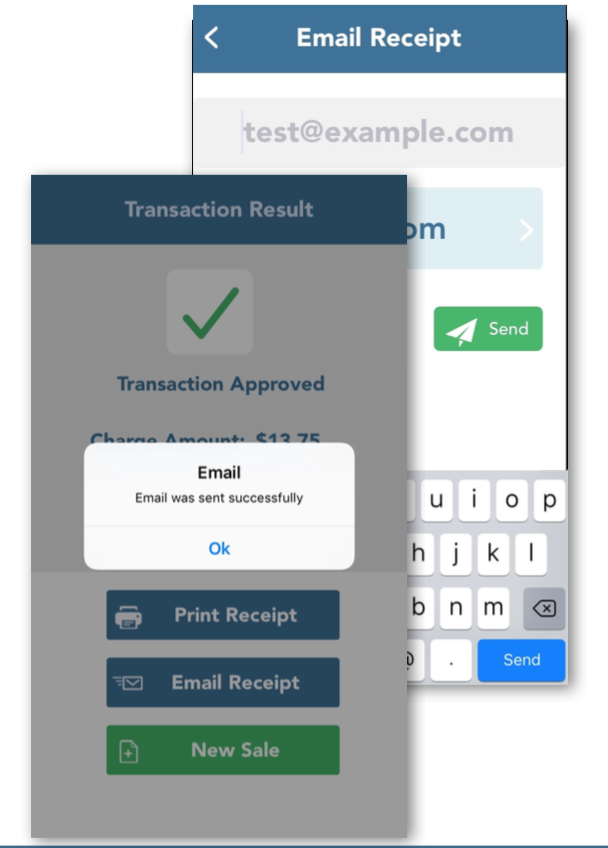
A confirmation pop up will appear, indicating if the email was sent successfully or failed to send.